Introduction and Key Insights
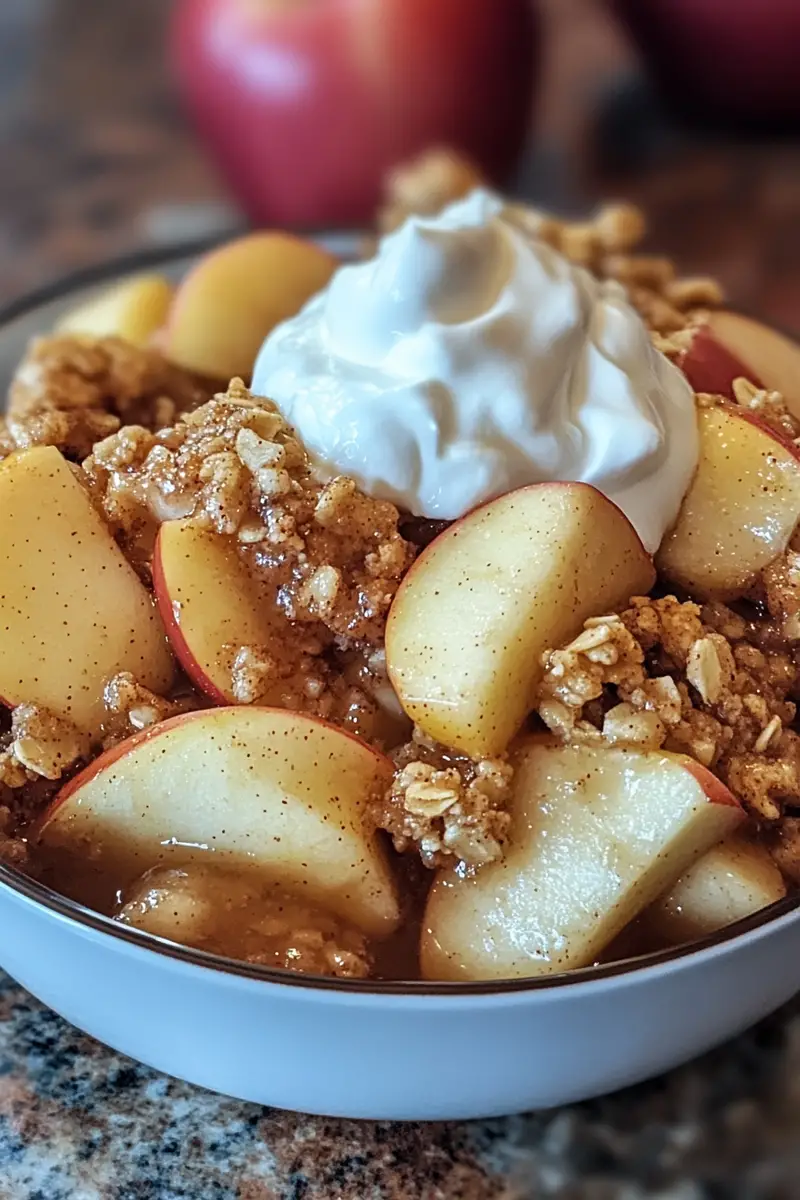
Old-Fashioned Apple Crisp is a delightful dessert that captures the essence of autumn. With its warm, gooey apples and crunchy topping, it evokes nostalgia and comfort in every bite. This classic recipe is not only simple to prepare but also offers a delightful way to enjoy fresh apples during the harvest season. Whether you are hosting a gathering or seeking a cozy family treat, this old-fashioned apple crisp is sure to impress.

The beauty of this dessert lies in its versatility. You can customize it with various apples or even add spices to suit your taste. The combination of buttery oats and brown sugar creates a crispy topping that perfectly complements the tender fruit beneath. Paired with a scoop of vanilla ice cream or a dollop of whipped cream, this dish becomes an irresistible indulgence.
In this article, we will explore the essential ingredients needed for the perfect old-fashioned apple crisp. We will also provide step-by-step instructions to guide you through the preparation process while offering tips for serving and storing your delicious creation. Get ready to embrace the flavors of fall with this timeless recipe!
Ingredients Overview for Old-Fashioned Apple Crisp
Apples (6 cups)
The star ingredient of your old-fashioned apple crisp is undoubtedly the apples. Choose a mix of tart and sweet varieties for a balanced flavor profile; Granny Smith and Honeycrisp are excellent options. You’ll need around six cups of peeled and sliced apples for the filling. This measurement typically equates to about 6-8 medium-sized apples depending on their size.
When selecting apples, look for firm ones without blemishes or soft spots. The quality of your apples significantly impacts the overall taste and texture of your dish; fresh apples will yield juicy results that meld beautifully with the topping.
Granulated Sugar (¾ cup)
Granulated sugar enhances the natural sweetness of your apples while adding depth to their flavor. For this recipe, you will require three-quarters of a cup. If you prefer a less sweet version or want to incorporate different flavors, consider adjusting the amount based on your preference or substituting half with brown sugar.
Sugar not only sweetens but also helps to create syrupy goodness as it bakes with the apples—this syrup adds moisture that keeps every bite deliciously satisfying.
Brown Sugar (½ cup)
Brown sugar introduces rich caramel notes that elevate your old-fashioned apple crisp’s flavor profile. Using half a cup brings out those deep flavors while contributing moisture to the topping mixture as well.
Feel free to adjust based on personal taste preferences; more brown sugar will lead to a richer taste while less may yield a lighter crunch atop your baked dessert.
Oats (1 cup)
Rolled oats are crucial for achieving that signature crispy topping in an old-fashioned apple crisp. You’ll need one cup of oats for this recipe—opt for whole rolled oats rather than instant versions as they provide better texture when baked.
Oats absorb moisture from both sugars and melted butter during baking which helps form that delightful crunch we all love in desserts like these!
All-Purpose Flour (½ cup)
All-purpose flour serves as a binder in your topping mixture while also contributing some structure to it. Half a cup is sufficient for creating an ideal crumble that holds together without becoming too dense or heavy.
The right amount ensures that your topping remains light yet sturdy enough to complement tender baked apples below without overpowering them.
Cinnamon (1 teaspoon)
Cinnamon brings warmth and spice—a quintessential addition when making an old-fashioned dish like this one! One teaspoon elevates flavors by providing aromatic notes that harmonize beautifully with sweet fruitiness from your chosen apples.
You can experiment by adding nutmeg or other spices if desired; however, cinnamon remains timeless in its ability to enhance comfort food classics like our featured recipe today!
Unsalted Butter (½ cup)
Unsalted butter plays two essential roles in our old-fashioned apple crisp: it enriches flavors while helping achieve optimal texture within both filling and topping layers alike! Use half-cup melted butter mixed into dry ingredients before spreading evenly over prepared fruit mixture prior baking time.
Opting for unsalted allows you complete control over saltiness levels throughout entire dish—resulting in balanced flavors everyone will appreciate once served warm straight from oven!

How to Prepare Old-Fashioned Apple Crisp
Step 1: Prepare Your Apples
Start by preheating your oven to 350°F (175°C). While waiting for it reach temperature gather all necessary ingredients listed above along with clean cutting board knife mixing bowls measuring cups spoons! Begin preparing fresh fruit by washing peeling slicing each variety selected earlier into thin wedges ensuring uniformity across pieces which promotes even cooking later down line.
Once sliced place them into large bowl sprinkle granulated sugar cinnamon mix thoroughly until every piece coated evenly then transfer mixture into greased baking dish measuring approximately 9×13 inches allowing space between each slice forming beautiful layer beneath crunchy topping awaiting its turn!
Step 2: Combine Topping Ingredients
In separate mixing bowl combine rolled oats all-purpose flour brown sugar remaining cinnamon pinch salt melting unsalted butter microwave-safe container heat until fully melted stir well ensure all dry ingredients coated thoroughly before pouring over baked fruit layer already prepared previously now spread evenly across top using spatula press lightly downwards creating cohesive crust-like layer comprising both textures seamlessly blended together ready bake away magic happens!
Place prepared dish into preheated oven bake anywhere between 30-40 minutes until golden-brown bubbly appearing edges allow delicious aroma fill kitchen beckoning loved ones gather around awaiting scrumptious desserts completion—time flies when anticipation builds excitement!
Step 3: Cooling Down Phase
After removing finished product from oven let sit cooling rack minimum fifteen minutes before diving right after serving guests patience pays off providing opportunity flavors meld nicely ensuring maximum enjoyment upon first bites taken! During cooling period consider preparing accompanying sides such as vanilla ice cream whipped cream drizzle caramel sauce enhancing indulgent experience further elevating satisfaction levels achieved through sharing special moments dining together enjoying heartfelt conversations laughter around table shared joys life brings forth reminding us why we cherish such traditions passed down generations past present future alike!

Serving and Storing Tips
Serving Suggestions
When it comes time serve up slices delectable old-fashioned apple crisp consider pairing alongside scoop velvety vanilla ice cream dollop freshly whipped cream atop—perfect balance contrasting warmth coldness creates splendid experience tantalizing taste buds leaving lasting impressions each bite savored slowly! You might also sprinkle additional cinnamon on top just before serving if desired adding final touch finishing elegance presentation wow guests even further!
For larger gatherings cut squares smaller size allowing guests sample more diverse treats available making enjoyable evening memorable full celebration flavor excitement every palate satisfied delighted choices provided round table atmosphere filled love community spirit shared connections built over shared meals cherished moments enjoyed together.
Storing Leftovers
Should there be any leftovers after delightful gathering don’t fret properly storing them ensures enjoyment continues beyond initial serving occasion! Allow cooled leftover portions cool completely before transferring airtight container refrigerate up four days maximum maintain freshness integrity original flavors retained best possible state enjoy later times craving something comforting familiar homey feel brought forth through baking process shared experiences evoked memories cherished fondly throughout years ahead making time spent family friends meaningful unforgettable reminders simple pleasures found within food creations made heart hands working together harmoniously blending efforts passions culminate beauty artistry deliciousness crafted lovingly cared about deeply appreciated always remembered fondly forevermore!
Mistakes to avoid
One common mistake when making Old-Fashioned Apple Crisp is using the wrong type of apples. Choosing the right apples is crucial for achieving that perfect balance of sweetness and tartness. Varieties like Granny Smith or Honeycrisp work exceptionally well because they hold their shape during baking and provide a delightful contrast to the sweet topping. Avoid soft or mealy apples, such as Red Delicious, as they can turn mushy and lack flavor.
Another frequent error is not properly seasoning the filling. Many people tend to skimp on spices, which can lead to a bland apple mixture. A good rule of thumb is to use cinnamon and nutmeg generously, as these spices enhance the natural flavors of the apples. Don’t forget to add a touch of lemon juice; it brightens the taste and helps prevent browning.
Additionally, underbaking or overbaking your crisp can ruin the texture. An underbaked Old-Fashioned Apple Crisp may result in crunchy apples that are not fully cooked, while overbaking leaves you with a dry, crumbly topping. Keep an eye on your oven and check for a golden-brown color on top before removing it. Use a toothpick to ensure the apples are tender but not mushy for best results.
Finally, neglecting to let your crisp cool slightly before serving can be a major oversight. Cooling allows the juices to thicken up, creating a more cohesive dish. If you serve it immediately out of the oven, you may find it too soupy and difficult to scoop. Aim for about 10-15 minutes of cooling time before dishing it out.

Tips and tricks
To elevate your Old-Fashioned Apple Crisp, consider adding a mix of nuts into your topping. Chopped pecans or walnuts can introduce a satisfying crunch and additional flavor dimension. Toasting these nuts lightly before mixing them into your crisp topping will enhance their flavor even further. Simply spread them on a baking sheet for a few minutes until golden brown—this extra step is worth it.
Another useful tip involves layering flavors in your apple filling. Besides cinnamon and nutmeg, try incorporating vanilla extract or even bourbon for an adult twist on this classic dessert. These additions will deepen the overall flavor profile and make your dish stand out at gatherings.
For an added textural element, consider mixing oats into your topping blend along with flour and butter. The oats will create a heartier crunch that contrasts beautifully with the tender apples below. Make sure to use rolled oats instead of instant oats for optimal texture.
Don’t forget about presentation! Serve your Old-Fashioned Apple Crisp in individual ramekins for an elegant touch at dinner parties or family gatherings. Not only does this approach enhance portion control, but it also allows everyone to enjoy their own personal serving topped with freshly whipped cream or vanilla ice cream.
Lastly, if you want to prepare ahead of time, consider making the apple filling separately from the topping. You can store the raw filling in the fridge overnight and assemble it just before baking. This strategy saves time without compromising flavor or freshness when you’re ready to serve dessert.
Suggestions for Old-Fashioned Apple Crisp
For those looking to experiment with their Old-Fashioned Apple Crisp recipe, consider swapping out some ingredients based on dietary preferences or seasonal availability. If you’re aiming for gluten-free options, substitute all-purpose flour with almond flour or gluten-free flour blends in your crisp topping while ensuring that all other components are gluten-free as well.
If you’re seeking a healthier version without sacrificing flavor, you can reduce sugar in both the apple filling and topping by using natural sweeteners like maple syrup or honey instead of granulated sugar. These alternatives add complexity while helping maintain moisture levels in your dish.
Incorporating fruit beyond apples could also take your crisp to another level! Pears pair beautifully with apples—just mix them together in equal parts for an exciting twist on traditional flavors. You might also explore adding berries like blueberries or raspberries into the mix; they’ll introduce vibrant colors and fresh tastes that complement cooked apples wonderfully.
For those who love spice, consider infusing ginger into both the filling and topping components of your Old-Fashioned Apple Crisp recipe. Fresh ginger adds warmth while ground ginger gives depth—both variations lend themselves well within this classic dessert framework.
Lastly, think about garnishing your finished dish creatively! Drizzle caramel sauce over each serving or sprinkle crushed graham crackers on top just before serving for added visual appeal and texture contrast that guests will adore.

FAQs
What type of apples are best for Old-Fashioned Apple Crisp?
The ideal choice of apples significantly impacts the overall flavor and texture of your Old-Fashioned Apple Crisp. Firm varieties like Granny Smith provide tartness that balances perfectly with sweetness from sugar added during cooking, while Honeycrisp offers both sweetness and crunchiness essential for great desserts. Steer clear of softer varieties like Red Delicious; they don’t hold up well during baking and may turn mushy instead of remaining firm throughout cooking.
Can I make Old-Fashioned Apple Crisp ahead of time?
Yes! Preparing an Old-Fashioned Apple Crisp ahead of time is entirely possible without compromising taste or quality significantly! You can assemble everything beforehand by preparing both apple filling along with crumb topping separately—store each component covered tightly in refrigerate until ready to bake later on same day—or keep prepared unbaked crisp frozen if planning further ahead!
How do I store leftover Old-Fashioned Apple Crisp?
To preserve any leftover portions of delicious Old-Fashioned Apple Crisp properly after enjoying it warm from oven! Allow cooling completely at room temperature then transfer covered tightly using plastic wrap/foil into refrigerator where it’ll stay fresh up-to five days maximum! For longer-term storage—and potential future indulgence—consider freezing leftovers instead; wrap portions securely before placing inside airtight containers/bags!
Can I use frozen apples in my crisp recipe?
Using frozen fruit such as frozen apples works fine when making an Old-Fashioned Apple Crisp! However remember: since frozen fruits release excess moisture once thawed during cooking process resulting sometimes watery mixture thus adjust other liquid components accordingly (like reducing added water/sugar). To achieve best results allow them fully defrost first!
What toppings pair well with Old-Fashioned Apple Crisp?
Pairing toppings enhances enjoyment factor significantly when serving warm bowls/plates filled luscious baked goodness like old-fashioned apple crisps! Popular choices include classic vanilla ice cream drizzled caramel sauce whipped cream sprinkled nuts/granola! Additionally feel free play around combinations finding perfect match satisfying every palate present!
How long should I bake my Old-Fashioned Apple Crisp?
Typically most recipes recommend baking an old-fashioned apple crisp between thirty-five forty-five minutes depending upon oven temperature used size pan being utilized; keep close watch toward final stages until topped achieves golden brown hue desired fruit becomes bubbly underneath surface!
Conclusion
Creating an unforgettable Old-Fashioned Apple Crisp requires careful attention to detail through avoiding common mistakes while utilizing helpful tips throughout process ensuring delicious results every single time! Focus closely selecting right type(s) apples since they form foundation dish adding unique spices elevates flavors immensely without overpowering natural sweetness fruit itself holds within! Remember importance patience letting sit cooling briefly enhancing overall experience when served warm paired favorite toppings kicking indulgent treat up notch!
In conclusion always strive explore variations customizing recipe suit preferences experimenting different ingredients/toppings discovering new favorites along journey cooking together family friends alike indulging joyous moments shared one another around table celebration traditions passed down generations one bite at time!
PrintDelicious Old-Fashioned Apple Crisp Recipe
This Old-Fashioned Apple Crisp is a timeless dessert featuring tender, cinnamon-spiced apples topped with a buttery, crunchy oat crumble. Perfect for cozy evenings or holiday gatherings, it pairs beautifully with vanilla ice cream or whipped cream.
- Prep Time: 20 minutes
- Cook Time: 45 minutes
- Total Time: 1 hour 5 minutes
- Yield: 6–8 servings 1x
- Category: Desserts
- Method: Baking
- Cuisine: American
- Diet: Vegetarian
Ingredients
For the Filling:
- 6 medium apples (Granny Smith, Honeycrisp, or a mix), peeled, cored, and sliced
- 1/4 cup granulated sugar
- 1/4 cup light brown sugar, packed
- 1 tsp ground cinnamon
- 1/4 tsp ground nutmeg
- 1 tsp vanilla extract
- 1 tbsp lemon juice
- 1 tbsp all-purpose flour
For the Topping:
- 1 cup old-fashioned rolled oats
- 3/4 cup all-purpose flour
- 3/4 cup light brown sugar, packed
- 1/2 tsp ground cinnamon
- 1/4 tsp salt
- 1/2 cup unsalted butter, melted
Instructions
- Prepare the Oven:
- Preheat the oven to 350°F (175°C). Grease a 9×9-inch baking dish or a similar-sized dish.
- Make the Filling:
- In a large bowl, toss the sliced apples with granulated sugar, brown sugar, cinnamon, nutmeg, vanilla extract, lemon juice, and flour. Spread the mixture evenly in the prepared baking dish.
- Make the Topping:
- In another bowl, combine rolled oats, flour, brown sugar, cinnamon, and salt. Stir in the melted butter until the mixture forms clumps.
- Assemble:
- Sprinkle the oat topping evenly over the apple mixture.
- Bake:
- Bake for 40–45 minutes or until the topping is golden brown and the apples are tender. Check at the 30-minute mark to prevent over-browning.
- Serve:
- Let the crisp cool for 10–15 minutes before serving. Enjoy warm with a scoop of vanilla ice cream or a dollop of whipped cream.
Notes
- For extra flavor, mix in 1/4 cup chopped pecans or walnuts into the topping.
- Adjust sugar based on the sweetness of the apples.
- Store leftovers covered in the refrigerator for up to 3 days. Reheat in the oven or microwave before serving.
Keywords: Old-Fashioned Apple Crisp, easy apple crisp recipe, apple crumble dessert, fall dessert recipes, cinnamon apple dessert, baked apple crisp


